Wednesday, 12 September 2012

Adventures into crochet

I've been umming and ahhing for ages now about give crochet a try and last night I decided to give it a whirl! I have never crocheted anything in my life so me my ball of yarn and a crochet hook ventured onto youtube to find some how to videos!

Now the pattern I had in mind is for a small amiguriri monster, Yes I know probably not the easiest thing to be setting ones sights on as a newbie. But with the power of the internet behind me I worked out most of it.

So I started off learning how to make a magic circle


Using this girls starting technique I was able to start the circle pretty succesfully. Although it was a little fiddly.


I then followed the pattern found here:

http://craftyiscool.blogspot.co.uk/2011/01/wanna-make-monster.html

To make these super cute monsters -
Her guide is brilliant and i managed to make a small monster albeit a little rough round the edges:


I cant wait to make more of these and to give them accessories. I have also found a pattern for other amiguriri that im looking forward to trying out very soon!

True proof that there is nothing the internet cannot teach you! :D :D


Wednesday, 5 September 2012

Apple Cosies

So another little project I saw and liked the look of were apple cosies. Now personally Im not too sold on the functionality of them as actual apple cosies however as a big fan of nectarines and peaches I think these would be highly useful to prevent mushiness in the bag for these fruits. So here we go!


Arent these super cute? I think so and with Xmas just around the corner and some of  those "have everything  already" people to get for I thought these might be a great idea!

Im starting off making a small cosie but there is a pattern for a larger one which ill provide for you aswell, Im likely to try out the larger one for my nectarines/peaches but this first one will be great for fun size apples etc like the ones my son has! :D

So to begin:

Cast on 14 stitches and knit 5 rows like so :
Then row 6 is to knit 12 stitches, yes only 12.
Now simply flip your knitting over, so it looks like this

Now slip one from your left needle straight onto your right one


Make sure your yarn is to the back and now knit the remaining stitches like normal from left to right!

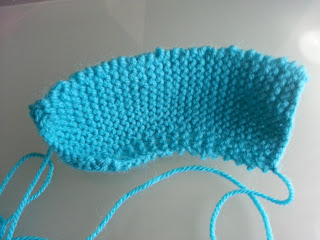
As you can see the last 2 stitches as seperated now we knit 2 full rows doing this starts to shape the bottom of the knitting slighty so it will be more "cup shaped" at the end :D

You can see it pulls the knitting up together at the end here. Now you simply repeat the 6,7 8&9 pattern rows another 11 times and then cast off!


Small Apple cosies pattern:
Cast on 14 stitches
Rows 1 - 5 Knit all
Row 6 - Knit 12, turn
Row 7 -  Slip 1, Knit 11
Row 8&9 - Knit all the stitches
Repeat Rows 6-9 11 more times
Cast off knitwise.

Larger Apple Cosies Pattern:
Cast on 16 stitches
Rows 1-5 Knit all
Row 6- Knit 14, turn
Row 7 - Slip 1, Knit 13
Row 8 & 9 Knit all the stitches
Repeat Rows 6-9 12 more times
Cast off Knitwise.

Im sure you could easily increase the size of these should you need to!

Now to stitch them together. If you use the loops that are poking out round the bottom of your piece you can thread the yarn through them and them pull them tightly together to give a circular finish.

Picture placeholder for bottom.


I left a small gap at the top of my cosie so i could add a button and loop on but you could easily stitch it all the way up! I have included pictures below of the stitched kind :)
I Used the spare yarn to make a button loop stitched with a plastic yarn needle. Ensure you make the loop large enough to fit around your chosen button.
Using normal thread I then attached a button to the otherside

Now add an apple and Whoot! A complete Apple cosie! :D


This is the fully stitched one!

Enjoy! <3


Saturday, 1 September 2012

Another bracelet & cabling

Ok so I've been eyeing up lots of cabling patterns of late and i was a little daunted about trying one out. So I've found me a simple cable pattern that i am currently trying out for a bracelet cover (as done before)

So this really easy pattern is only 4 rows of pattern repeated and its only over 8 stitches!  Told you it was a simple one!

As normal i dont like to make things easy for myself so my first wool choice was a bamboo and cotton purple wool. However when i tried to start this pattern with this yarn i kept getting caught up in the threads and making a general mess so i changed my yarn! Now im using a totally fab Sirdar Eco Wool dk 100% undyed virgin wool.

Ok so cast on 8 stitches!


Now to start the pattern: So Row 1 (wrong side) K2, P4, K2
So far not scary!


Row 2:  P2, K4, P2
Row 3: K2, P4, K2

Now row 4! P2 then slip the next 2 stitches onto a cable needle and hold them at the back of your knitting like this:


Now K2 from your left needle, then heres the fiddly bit K2 off the cable needle. You could chose to either knit them straight off your cable needle or you could slip them back onto your left needle and then knit them! Then P2 to finish. You need to be extra careful when taking the stitches off the first few times i did this i pulled my stitches off of my right needle and then my left! Clumsy i know You could easily use something to stop them sliding off tho ie a peg etc :D

The main thing i had to watch for/remember was that once i had my stitches on the cable needle ensure the yarn is AT THE BACK of your knitting as you are knitting the next 4 stitches! Otherwise youll end up with extra stitches etc :)

Thats it! Yup just repeat these 4 rows of pattern and this is what happens:


Now repeat the 4 rows and it will start to look like this:


Now im knitting this to fit round a plastic bracelet and i have a brooch i may or may not attach, we will see at the end!


Once i have this at the required length i will then set about stitching it around the bracelet (as in my earlier posts)

I then take the plastic bracelet and wrap the swatch of knitting around it and using the threads from the ends i start stitching it around it.


Stitch it all the way round , i started with the right sie and stitched it as far as my yarn allowed me, unfortunatley i didnt leave enough yarn on one end so i had to stitch in form the other side til the whole thing was sawn down one side like this:


 I then used a spare piece of yarn stitch the end pieces together:

Then simply cut off the loose ends and straighten up the pattern!!

Here is the finished product!!:


Im loving this bracelet and I will have to get some more wool of this kind! I will also be trying this again in a different type to see how it alters the end result.

**Please note this pattern Is for 8 stitches and for the yarn i used this just "just" fitted around the bracelet I had chosen to cover. You are best to measure around your bracelet to check the size of the swatch you will need to create and test your wool to see how far it stretches. If you need a longer pattern I found a wealth of them available at http://www.knittingfool.com/pages/StitchCountList.guest.cfm
This search option allows to search by stitch size and is utterly wonderful for finding just the right pattern for your project :D **

Curtain Tiebacks

Many apologies for yet more delays! Sick Children are time consuming! :D

So I have a birthday coming up and very little pennies in the bank so I needed to make something impressive yet thrifty. Cue Curtain tiebacks!  The aforementioned birthday person Is currently redecorating their bedroom, which gave me the perfect opportunity to make something for them.

So start Simply knit 14 stitches across using stocking stitch knit approx 60cm in length. This will naturally roll in on itself. I chose to make these in Red, black and cream (to match the chosen decor) So simply knit 2 swatches of each colour. When knitting these please ensure you leave a good length of tail on both ends of the knitting  you will need these to afix D rings at the end!


Next step. Take your three strips (1 of each colour)  and plait.  I then, as with other projects, stitched the plait in place using the last cross over section and stitching into the back of the tie backs (to keep it neat).I used lengths of matching wool to try and disguise the stitching as much as possible.

Then plait and repeat with your 2nd tie back, trying to match (as closely as possible) the plait tension of your first one.


Once i Had all 4 ends (on both plaited pieces) stitched i then got my D rings 1.25 inches (32mm) silver ones. Personally i would get larger ones next time around 40mm i think would be fine for these pieces tho. I then attatched these stitching then into place with the tail ends of the wool 


And hey presto you now have curtain tie backs in your desired colours Like this!


Saturday, 18 August 2012

The I-Cord Headband!

Ok so as you probably know by now I'm getting to be a huge fan of  I-Cords and their versatility!  Now since having my hair cut short I wear many a hair band and i prefer the fabric ones. So i thought...Why not make myself one!  So i picked up my needles and here we go!

So i started out making 3 I-Cords, Now mine were approx 18 inches long but naturally it will depend how big your head is! Remember to make allowances for the elasticity of the wool and also for the braiding! Also try to leave a good length of yarn at both ends as you will use them to stitch the braid into a round.

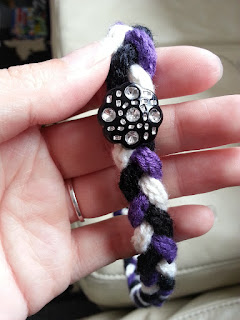
Now you have your braided piece I simply got my darning needle and used the extra yarns to stitch together the braid into a circle I tried to match colour for colour so it wouldn't look too messy. This bit will be at the back at the bottom tho so don't panic even if it comes out a lil messy.  I then simply tied off the ends as tightly as i could and then cut them off! Hey Presto you now have a braided I - Cord  circle!  Now tbh you could just leave it like this. But im a lover of bling and fun things especially for my hair so I decided Id add a lil sparkly button. You could add anything tho, Ribbon Bows, Gems, Feathers anything you liked!  So what i did for this was put the band on and made sure the knot was at the bottom at the back like this :
I then used my darning needle to mark out where i want my button to be.
Then simply remove it and using a needle and thread I stitched my little button good and tight!


Now simply cut off the extra thread wear and enjoy! :D
Im looking forward to making more of these and as i go experimenting with different ways of making a neat finish on the circle and what things i can add for extra bling! 

Wednesday, 15 August 2012

Knitted Cuff with Ribbon

Unfortunately I've been a bit rubbish with this one and I have failed at taking pictures along the way. However i will be making another one shortly so i promise i will take them then.

However this was made with an extremely simple pattern which i will share with you now!

Here is the finished product!

Ok so for this I cast on 1 row of 11 stitches, then I knitted approx 4 rows - this is to make space for popper fastenings at the end then followed this 2 row pattern to the desired length:
Knit 5 Wrap Yarn round and then knit one as normal then Knit 5
Knit 5 slip the yarn and then knit one as normal then Knit 5.

Ok so the most difficult bit is the middle stitch as this is the row that will allow you to put a ribbon inside.

So all you need to do is Go to do your knit stitch but instead of wrapping your yarn round once (like normal) wrap it round twice! Simple!:

Pic to follow here!

Then on your next row all you need to do is take the extra yarn bit off your needle and then knit the proper bit!

Pic to follow here!

Once i got to the length I wanted then I knitted 4 more rows, again for poppers. then I cast off!

I then threaded a 9mm ribbon through the loops (I found this one fitted best), you don't have to do every one if you don't want to you could easily do every 2 or 3 etc. Then at the middle I tied a bow with 2 loops. Once I had my ribbon in I cut it off leaving a few cms at the back which I then stitched into the back of itself to secure it.

 I used normal needle and thread for this and then I attached black poppers to the ends for wearing!


Simple! But also very eye - catching when done with contrasting or stand out colours! As mentioned I will be making more of these as I have an awesome stash of character ribbons!

Distractions!

Apologies for the slight hiatus I have been busying myself with the sunshine, de-cluttering and general day to day things, not leaving myself a huge amount of time for knitting!

However I have now set up a Facebook page and an Etsy Store for my items! I'm very happy with it so far and its keeping me out of mischief!  http://www.facebook.com/FoxgloveFlair & http://www.etsy.com/shop/FoxgloveFlair?ref=si_shop!!

While I was setting this up I had a new idea for a bracelet made with I-Cords!

So I started off Knitting 3 very long I-Cords I made them about 18 inches long I then plaited them together like this :
I left lots of Yarn at either end, as I used it to stitch the bracelet together. So using my Darning needle (yes it is slightly bent :(   

 I then wrapped the i-cords round twice and using the end yarns i stitched them together, I made an effort to stitch the cream yarn into the back of the cream I-Cord and so on.
So I then ended up with this:
I still had lots of yarn left over at the end and tbh if I was going to do this again I would likely just stitch them all in to look tidy however on this occasion I wrapped them round. I then stitched them in place with normal needle and thread at the back. Thus giving me this as a final item:
I'm really happy how this turned out and I am utterly addicted to making things with I-Cords atm! Next up for me will be a plaited Headband!