Arent these super cute? I think so and with Xmas just around the corner and some of those "have everything already" people to get for I thought these might be a great idea!
Im starting off making a small cosie but there is a pattern for a larger one which ill provide for you aswell, Im likely to try out the larger one for my nectarines/peaches but this first one will be great for fun size apples etc like the ones my son has! :D
So to begin:
Cast on 14 stitches and knit 5 rows like so :
Then row 6 is to knit 12 stitches, yes only 12.
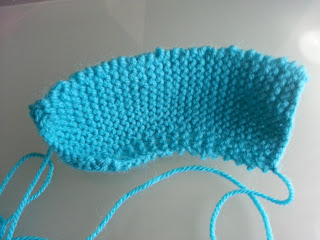
Now simply flip your knitting over, so it looks like this
Now slip one from your left needle straight onto your right one
Make sure your yarn is to the back and now knit the remaining stitches like normal from left to right!
You can see it pulls the knitting up together at the end here. Now you simply repeat the 6,7 8&9 pattern rows another 11 times and then cast off!
Small Apple cosies pattern:
Cast on 14 stitches
Rows 1 - 5 Knit all
Row 6 - Knit 12, turn
Row 7 - Slip 1, Knit 11
Row 8&9 - Knit all the stitches
Repeat Rows 6-9 11 more times
Cast off knitwise.
Larger Apple Cosies Pattern:
Cast on 16 stitches
Rows 1-5 Knit all
Row 6- Knit 14, turn
Row 7 - Slip 1, Knit 13
Row 8 & 9 Knit all the stitches
Repeat Rows 6-9 12 more times
Cast off Knitwise.
Im sure you could easily increase the size of these should you need to!
Now to stitch them together. If you use the loops that are poking out round the bottom of your piece you can thread the yarn through them and them pull them tightly together to give a circular finish.
Picture placeholder for bottom.
I left a small gap at the top of my cosie so i could add a button and loop on but you could easily stitch it all the way up! I have included pictures below of the stitched kind :)
I Used the spare yarn to make a button loop stitched with a plastic yarn needle. Ensure you make the loop large enough to fit around your chosen button.
Using normal thread I then attached a button to the otherside
Now add an apple and Whoot! A complete Apple cosie! :D
Enjoy! <3


No comments:
Post a Comment