Saturday, 18 August 2012

The I-Cord Headband!

Ok so as you probably know by now I'm getting to be a huge fan of  I-Cords and their versatility!  Now since having my hair cut short I wear many a hair band and i prefer the fabric ones. So i thought...Why not make myself one!  So i picked up my needles and here we go!

So i started out making 3 I-Cords, Now mine were approx 18 inches long but naturally it will depend how big your head is! Remember to make allowances for the elasticity of the wool and also for the braiding! Also try to leave a good length of yarn at both ends as you will use them to stitch the braid into a round.

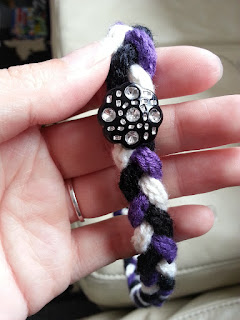
Now you have your braided piece I simply got my darning needle and used the extra yarns to stitch together the braid into a circle I tried to match colour for colour so it wouldn't look too messy. This bit will be at the back at the bottom tho so don't panic even if it comes out a lil messy.  I then simply tied off the ends as tightly as i could and then cut them off! Hey Presto you now have a braided I - Cord  circle!  Now tbh you could just leave it like this. But im a lover of bling and fun things especially for my hair so I decided Id add a lil sparkly button. You could add anything tho, Ribbon Bows, Gems, Feathers anything you liked!  So what i did for this was put the band on and made sure the knot was at the bottom at the back like this :
I then used my darning needle to mark out where i want my button to be.
Then simply remove it and using a needle and thread I stitched my little button good and tight!


Now simply cut off the extra thread wear and enjoy! :D
Im looking forward to making more of these and as i go experimenting with different ways of making a neat finish on the circle and what things i can add for extra bling! 

Wednesday, 15 August 2012

Knitted Cuff with Ribbon

Unfortunately I've been a bit rubbish with this one and I have failed at taking pictures along the way. However i will be making another one shortly so i promise i will take them then.

However this was made with an extremely simple pattern which i will share with you now!

Here is the finished product!

Ok so for this I cast on 1 row of 11 stitches, then I knitted approx 4 rows - this is to make space for popper fastenings at the end then followed this 2 row pattern to the desired length:
Knit 5 Wrap Yarn round and then knit one as normal then Knit 5
Knit 5 slip the yarn and then knit one as normal then Knit 5.

Ok so the most difficult bit is the middle stitch as this is the row that will allow you to put a ribbon inside.

So all you need to do is Go to do your knit stitch but instead of wrapping your yarn round once (like normal) wrap it round twice! Simple!:

Pic to follow here!

Then on your next row all you need to do is take the extra yarn bit off your needle and then knit the proper bit!

Pic to follow here!

Once i got to the length I wanted then I knitted 4 more rows, again for poppers. then I cast off!

I then threaded a 9mm ribbon through the loops (I found this one fitted best), you don't have to do every one if you don't want to you could easily do every 2 or 3 etc. Then at the middle I tied a bow with 2 loops. Once I had my ribbon in I cut it off leaving a few cms at the back which I then stitched into the back of itself to secure it.

 I used normal needle and thread for this and then I attached black poppers to the ends for wearing!


Simple! But also very eye - catching when done with contrasting or stand out colours! As mentioned I will be making more of these as I have an awesome stash of character ribbons!

Distractions!

Apologies for the slight hiatus I have been busying myself with the sunshine, de-cluttering and general day to day things, not leaving myself a huge amount of time for knitting!

However I have now set up a Facebook page and an Etsy Store for my items! I'm very happy with it so far and its keeping me out of mischief!  http://www.facebook.com/FoxgloveFlair & http://www.etsy.com/shop/FoxgloveFlair?ref=si_shop!!

While I was setting this up I had a new idea for a bracelet made with I-Cords!

So I started off Knitting 3 very long I-Cords I made them about 18 inches long I then plaited them together like this :
I left lots of Yarn at either end, as I used it to stitch the bracelet together. So using my Darning needle (yes it is slightly bent :(   

 I then wrapped the i-cords round twice and using the end yarns i stitched them together, I made an effort to stitch the cream yarn into the back of the cream I-Cord and so on.
So I then ended up with this:
I still had lots of yarn left over at the end and tbh if I was going to do this again I would likely just stitch them all in to look tidy however on this occasion I wrapped them round. I then stitched them in place with normal needle and thread at the back. Thus giving me this as a final item:
I'm really happy how this turned out and I am utterly addicted to making things with I-Cords atm! Next up for me will be a plaited Headband!

Thursday, 9 August 2012

More side projects!

After speaking to my beautiful best friend she utterly inspired me to get on with a little knitting! As my bamboo needles are in use (with grey panel for my cushion) I decided id do a little more knitted jewellery so here is my next project:


So i found out a couple of my old plastic bangle, I'm going to use this one first I've measured the width x 2  which is 2inches and it should be around about 8.5inches all the way round:


 and as I've been dying to get to work with my newest wool. Here i go!


I'm knitting a 2inch by 8.5inch square to fit round this. I'm using a Sublime cashmere merino silk dk in a pale grey as you see here, it was pretty expensive and certainly the most pricey wool I've bought at around £6 for 50g. It is a gorgeous silky wool and I'm hoping it'll give real definition to the moss stitch pattern I'm going to use (kudos to Clare here!).


The stitch is looking fantastic however it doesn't look like its supposed to! After some searching it appears I've been a fool and written my pattern down wrong (yes again!) So I have very successfully been doing rib stitch which while it looks fantastic its not what I was aiming for! So I have decided I shall carry on and instead I shall do seed stitch (moss stitches smaller sister). Perhaps I will alternate the rib and seed stitch or i shall just leave this bit. We shall wait and see!


Finally figured it out! So as I continue Im going to do around 10 rows of seed stitch then 3 rows of rib to try make a different pattern! :D
And i end up with this!

Now that I've done 8 inches however i have realised that this is now too long and too wide for the bracelet i had chosen so I've done an emergency substitute. :9 I shall bear this in mind for next time to ensure that if my chosen pattern will naturally widen the swatch that i will need to compensate for that by reducung the number of stitches For this pattern i think i would've been fine with 13 or 15 stitchs rather than 19 as I have done and  reckon i only needed around 6 1/2 inches to 7 inches due to the elasticity of the wool.
Now to stitch it round my bracelet:

I left a good length of yarn after i cast off which i am now using to sew up the edges, it needs to be relatively neat on the upright part as this will be visible but along the edges its not as important as It will be turned to be on the inside.

I finish up neatly (as i can) stitching the ends together then i twist the wool round and straighten up the pattern so i end up with this:


Unfortunately i only had a bright pink bracelet so it teeny parts it is still visible but i would def recommend a plain coloured one wherever possible, unless you want to do an open weave stitch ofc to let the colour through! The possibility's are endless!

I've had lots of fun making this bracelet and I have learnt a great deal while making it, and i can't wait to make some others! Overall I'm very happy for a first try! :D :D


Wednesday, 8 August 2012

Side project: The Icord!

I happened upon this pattern when I was browsing for easy things to knit! and I have to say I LOVE them! they're so versatile I think every knitter would need these in their catalogue:

Here is the video i used:

http://www.youtube.com/watch?v=jcGj6tpqeJA

Simple right? Well ive being playing around with them and i made the following. Rough round the edges i know but you get the idea :)  Ill be experimenting with these and the vast array of ribbons i have. You can also make larger versions of these for bag straps,cords,decorations and my fav (and also on my long project list) tie backs a bit like these:

These are fantastic for using up leftover bits of yarn and are really quick to make, these can also be done with a crochet hook! Perfect! :D

The cushion continued..

Ok so I managed to finally knit 18" of the cream, Ill admit I did make an error at around the 4" mark but my mum kindly took me back 2 rows so I could carry on but I'm pretty pleased that i only made the one mistake! It felt like it took me forever but I fairly got up some speed with all that practice so I reckon i'm getting a bit quicker!


However now I'm done with the cream I will be doing the grey, The grey I'm doing in Basket weave. So it will have a little squares pattern on it. Now I started off using the pattern provided here: http://knitting.about.com/od/knittingglossary/g/basketweave.htm

Unfortunately I misread it and so I have gone a little wrong already :( I repeated the second part of the pattern so I have two rows of squares that are the same. However I decided to just carry on now that I have figured it out. So far it looks like this:


I'm using a different wool that certainly feels really different, it fairly rough compared to the bay soft wool I was using beforehand,but at the same time I think the contrast will be nice in the end!  Hopefully now i have it figured out the rest will go a lot more smoothly :D I struggle with counting my stitches and coping with the chaos of a family around me but im learning to tell which stitch is needed by which side of the wool it is on.

For example when the wool looks like this:


My next stitch will be a purl.  But if it looks like this:

Then my next stitch will be a knit. So really the onus is on getting my first row right and remembering when I've done 3 rows (for my pattern).

The pattern is going slowly for me (I'm so easily distracted!) I have made an error or 2 but i'm just rolling with it atm! At least it will be unique!:

Picture placeholder!


So Now I Have finally finished my Basket weave panel now I've been looking up a cable pattern to do my purple and final panel in! So i'm using approx 33 stitches per panel so I have chosen a 16 stitch pattern (so ill do it twice) Its a nice simple one so I don't get too overwhelmed this is the one I have chosen:

Picture placeholder

Found here:
http://www.knittingfool.com/pages/stCatalog2.guest.cfm?StitchID=891&name=Bulky%20Double%20Cable&numofst=16&stplus=0&rows=10&rplus=0&sym=0

I shall be doing this in a dusky purple colour  -

Sunday, 5 August 2012

The first cushion Cover!

So in my attempts to be thrifty and to jazz up my home a bit I have decide to try undertaking my first project, A cushion cover! I want to start basic as I've been knitting for about 4 days now and i can only really knit squares comfortably!

I shall be doing 3 panels in Grey, Cream and purple and I'll be trying different stitch patterns on each panel! So far i have started knitting the Cream panel It will just be a basic stocking stitch (K1 row, P1 row repeated)

Knitting so Far! :


Im using Rico Baby Soft DK wool in Cream:


And 4.5mm (UK 7) Bamboo Needles (im loving bamboo needles)


In the future i want to make ones like these ones, Ill be cabling my last panel for my cushion so if that comes out well ill see about one of these!


Day 1!

Hello there!

So today i decided to start a blog. Of late I've been trying to find ways of making more and spending less. In the current economic climate i think its important to find as many ways and means of saving money wherever possible. I am a mother of 2 boys (6yrs and 1yr) and happily living with my partner in the North East of Scotland. This close to the coast we tend to get some harsh Winters and plenty of rain,fog and general constant drizzle coupled with the occasional heatwave! Anyway enough about me!

A month ago I decided i need to clear out all the junk in my house and make space for my growing family, and try to really make our house a "home" For me that's being surrounded with only practical things, pretty or sentimental things. A place that really reflected my family as a whole. So i set about sorting the house room by room.   Now it may sound cliché but doing one room or even one cupboard at a time really does work! I gave myself 3 boxes, One for items to sell, one for items to take to the charity shop and one for rubbish/broken items. You'd be surprised how many broken things there are to find hiding in drawers and cupboards!

Now its easy to take things down the dump, and drop things off at the charity shop, but what to do with the items you want to sell? Well Ebay was always my big go to for these situations but with hefty charges from both ebay and paypal and then rising postage charges I found for some items this was just not worth it. SO i needed another avenue. Now Carboot sales seemed the next step here as Yard sales are pretty much non existent (or certainly are up by me). However ill admit, the thought of dragging my 2 kids and my partner out in our little car to potentially sit in the rain for a few hours does not fill me with happiness and I am happy to say i found another way. I found Facebook. Now I can only talk for facebook here as the only social networking site i use other sites may very well have similar things that you could use. For me I found a group called Moray Cheapcycle and there it began. 250 photos later and the requests started coming in. Now just as you'd expect when buying second hand there is still a lot of offers & deals made. For me I just want rid of my things and Im happy to get anything in return to use for other items. Ill admit to begin with I think I went a little crazy, whenever i had completed a sale I pretty much used the money straight away to buy something from someone else. But I'd like to think I came out the other side all the better for it. In selling off items that were gathering dust in my wardrobes, cupboards and attic I managed to Buy the following - A mid Sleeper bed for my eldest son, A Corner sofa, A smaller dining table and chairs, A large Canvas for my front room, Some hanging photo frames, a tall display cabinet, a tv unit, coffee table and shelving,a rug, An Outdoor Pedal Tractor for my little ones, Clothes for my Kids and a Trampoline! I think If id saved all the pennies i had made from selling things i would have made around £300 or so. However I'm very happy with "trading" My spare things for items that i love and fit in perfectly with my décor :D. I would happily recommend these groups as a perfect way to either sell your items or find cheaper items for you home!!

Now for my house im concentrating on my front room atm, which in my house is a living/dining area thats pretty long, It houses 2 pcs, a dining table, a corner sofa, a sideboard and my tv. It also has a cabinet a toy box and a set of shelves with my coffee table also.  For me I also tend to have 1 or 2 clothes driers up at a time (as i said our weather is not the best). So far the whole front room is 2nd hand or recycled, the only thing that was bought "new" was the carpet and even then it was on sale at the time :)

 Now as part of my front room transformation I would like some new cushions to go on my sofa. As such i decided i would make some just the way i wanted them and in the colours that matched my front room.Now how best to do this? Knitting! Thats what i need knitted cushions covers.

Now the biggest problem there is, I dont know how  to knit, but, i know someone that does and i have the power of the internet behind me! And so begins my first project which i shall be updating on here as i progress with the other bits and pieces that i make along the way, I will try to include links to any patterns i make/find etc and Would love to hear about some of your finds and makes too!